Not my write up, but useful to be on this site 
This is my writeup on ALTERNATIVE scratch repair which refer to as spot painting. this is not for everyone and it is not a perfect paint job repair like a repaint of a whole door. it is meant to be SIMPLE, CHEAP solution for big scratches. Do not bother doing this on small swirl mark scratches as it does not make sense to do so, only for big scratches such as a serious car keying type of scratch. I have used this on my bumper, front lip side skirt touchups and side view mirror.
I had the photos sitting around on my photobucket and decided to share them for those out there who may not hvae the money for full paint jobs and repaints of car parts like doors etc...
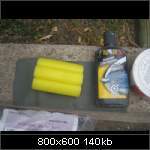
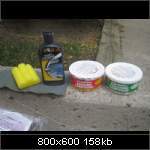
Supplies
-300, 500, 2000 grit sandpaper.
-Paint Can of your base coat with clear mixed in
-Etch Primer or Primer
-Sponge or Foam Pad like Soft Styrofoam
-Heat Gun
Supply photos of some things i use
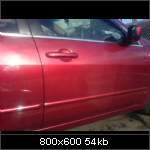
Like most paint work, you should start with wetsanding the area around the scratch, i have no before photo but it was a deep semi metal dented scratch to the metal, I sanded down to primer where i could get the paint even enough to not feel. Although there is a dent which is visiible i did not bother filling it, but you can if you would like, i repaired this car for a friend who asked me to do so and did not care much of the outcome as long as it was not the deep metal scratch he had on it before.
1) Basically use a wetsand sandpaper with a foam pad or even a med stiff sponge, wrap the sandpaper around it and dunk it in water and sand for a bit and redunk the sponge every little while just keep the water dripping so it washes away the sanded particles. I would use about a 300grit or higher for the sanding at this stage maybe higher but no lower at this point unless you have geaping scratches that need to be worked out. after you use the 300 you can move higher to a softer grit of about 450 or so, to help smooth it even more.
At this point you should have something like in the photos depending on how deep your scratches. keep feeling the surface to try to get it as smooth as possible, do not exceed more then 4 or so inches around the scratch as it will be way to big around the scratch, if you do dont worry. there will be minor scratches from the surrounding areas from sanding, do not worry you can lightly paint over these areas later.
2) after cleaning and completely drying the area with a heat gun, you can use etch primer around the exposed metal area and over the scratched up sanded area, do not go past the heavily sanded area with your primer.
3) let the primer dry a little and then proceed with your base coat in this case an maroon red. spray from 1 side to the other gently on the trigger from about 20cm away as not to overspray onto windows etc, i would recomment masking other parts of the car as well. do it lightly a little before the sanded area to completely cover the are, try not to paint on the smooth surface of the panel where there are no sanded marks as the paint will not grab on as well and may eventually flake off. do 1 or 2 pass coats and let dry each time, this will help ensure a nicer finish, if you are better at painting you may do 3 or 4 coat passes each being light enough to not drip. if you mess up your paint let wet paint even you will have a tar-type paint disaster.
4)let dry for 1 hour with heat gun blowing on it, not too close, or wait for 1 month if you want, but if you dont care much and want to get it over, after its dry with a heat gun for about 1 hour or so u can use some rubbing compound or 2000grit wetsanding over the area. very very lightly as not to scrape off the paint you jus did but to help make it a lil shinier. then you can wash it with water and leave it for about a month and then polish it. Although it is recommended not to wax or polish it it think for like 3 months or something, i have done it without much problems.
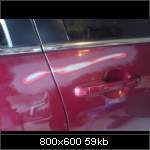
As you can see the area is somewhat visible a little clouded after wetsanding it with the 200grit so you may not even want to wetsand it after and just leave it, if its good enough to your liking. after time this usually fades away and blends better with the panel but atleast you dont hvae a gaping scratch there.I HIGHLY recommend getting a paint with the clear mixed in that way yoyu dont have to use a seperate clearcoat which in this case my friend got jus the base coat mixture and no clear so i had to use some seperate primer which i had lying around but hate using since its hard to spray and comes out looking a littly off so i had to wetsand it after. If you get the mixed clear in the paint you will ahve superior results like in some of my other diy threads.
heres after photos i didnt take any before photos as i was not planning on doing a diy or anything with them at the time. the rear bumper had some sccratch marks from bumper scrapes and hits so it was lighlty sanded and painted, but most of the work was put into the door. ITS NOT PERFECT BUT IT WAS GOOD ENOUGH FOR LIKE $30 WORTH OF SUPPLIES and 1 hour of time.
I would say one should try this themselve...b4 taking to workshop... as they cost alot.... some of it u might do ur self ....and save alittle cash...
pm me for shopp location to get EXACT computer paint match thanks