Correct manufacturer's (OEM) procedure to change CVT fluid in K313 CVT transmission of Altis 1800 CC (Grande etc.)
NOTE: I will be gradually updating this post; due to limitation of time on my end. So please keep on checking for further updates.
DISCLAIMER: EVERY EFFORT IS MADE TO STATE THE CORRECT PROCEDURE & INFORMATION; HOWEVER THE WRITER IS NOT RESPONSIBLE FOR ANY ERRORS OR RESULTING LOSSES WHATSOEVER DUE TO USE OF THIS THREAD OR ITS DERIVATIVES. USE / FOLLOW THIS INFORMATION ON YOUR OWN RISK AND COST
Background:
This thread will define the correct procedure to change CVT fluid. Generally there is lot of confusion among users as to how the CVT fluid be changed in their automatic transmission which is a CVT. This thread will specifically cover transmission K313 that comes with 11th Gen Altis (1800 cc).
It has been learned from user experiences that many dealerships are not following correct procedure to change the CVT fluid.
I myself own Corolla Altis Grande 1.8; Sept 2016 model and have done CVT fluid change myself at home and recently helped my cousin for his Grande December 2015 model.
At the time of CVT fluid change of my Grande it was 28,000 km driven (ODO) and 2 years since manufactured by IMC.
Fundamentals to know
1. One key feature to understand is that CVT fluid expands substantially with increase in temperature and contracts when cold. You must keep this characteristics of fluid in mind as during various stages it will help you to avoid confusion/mistake.
2. The CVT fluid name for 1800 CC 2ZR-FE engine having K313 CVT is "CVTF-FE" by Toyota. Never, ever use any other fluid than this specific name. I have come across vendors that suggested using "CVTF-TC" instead of above (CVTF-FE) by stating that both are same! I strongly urge NOT to listen to anyone; ONLY follow USER'S MANUAL .
3. Plan to change CVT fluid in cold weather if possible or otherwise in early morning hours or evening; as we would need to correct fluid level when its temperature is around room temperature.
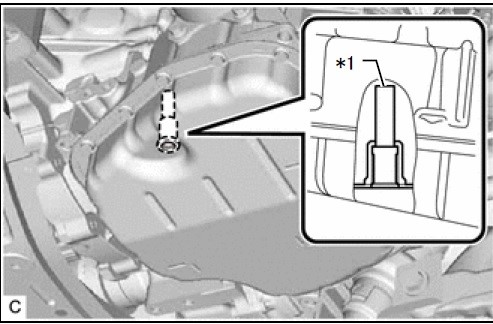
4.The K313 CVT specifically has a 6 mm Filler Tube inside the drain nut area projecting upwards (see *1 in figure below) which is meant to (1) allow higher level of CVT fluid inside the chamber (this is a design feature in many other Toyota also) (2) To set correct fluid level (3) Drain out large portion of CVT fluid when you remove this Filler Tube using 6 mm L key
See below the Filler Tube *1
5.The CVT fluid level has to be set to the exact top level of this Filler Tube. But under what conditions? The conditions for establishing correct CVT fluid level is that (i) The temperature of fluid inside the CVT must be strictly between 35C to 45C. (ii) The engine must be running (iii) Car is parked at leveled ground, the slope shall be within + or - 1 degree in longitudinal direction
6.The greatest challenge of all the steps which is grossly neglected by users as well by most of dealerships (as far as I know based on my limited information, none of the dealership did this correct) is to know the exact temperature and adjust the fluid level at specified temperature of 35C-45C. Fortunately, the ECU of 2ZRFE (Altis) has builtin capability to tell you that when is the right temperature of 35C to 45C and you need to proceed or should you not do the fluid level correction. We will learn this procedure with the help of videos that I will post.
Tools and hardware needed
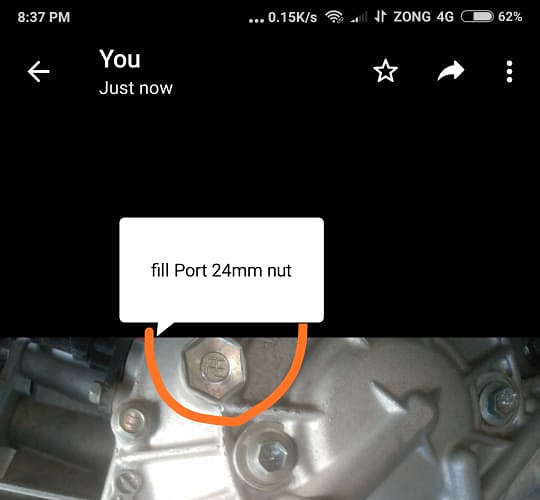
- 24 mm socket with extension - to open filler port
- 6 mm L key - to open the drain nut and Filler Tube
- Screw driver (normal size) - to remove various shields
- Graduated glass flasks
- Pouring funnel
- Collection gallons (8-10 liters)
- Collection tray (5-7 liters)
- Torque wrench(es) for torquing 15 in-lbs (*1 Filler Tube), 30 ft-lb (24 mm filler bolt), 36 ft-lb (drain plug)
- Level
- Car lift stands - 4 Nos.
- Hydraulic jack - 1 ton capacity or more - 1 No.
- Access to Techstream or other such software via special cable to get connected to DLC3 port for resetting the learn values and calibration of CVT fluid (this might not be needed in usual CVT fluid change)
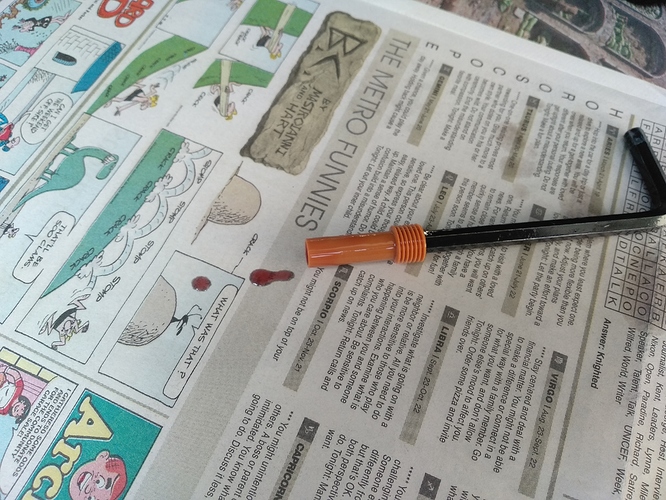
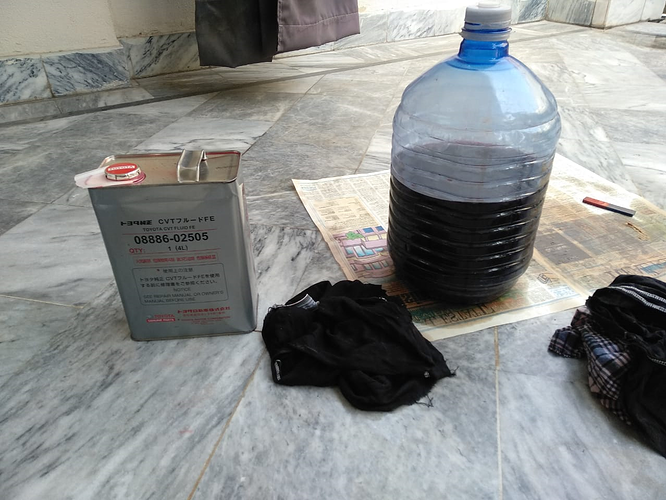
- Arrange two tins of Toyota CVTF-FE; each tin is 4 liters.
Detailed Procedure
Caution: Do-It-Yourself (DIY) only if you are good in using various tools and have previously done some work on your car. However, otherwise, fully understanding this procedure will help you ensure that when you are changing CVT fluid at a workshop, the technicians wont be able to mislead you.
1. Arrange all tools as listed.
3.5 tons hydraulic jack
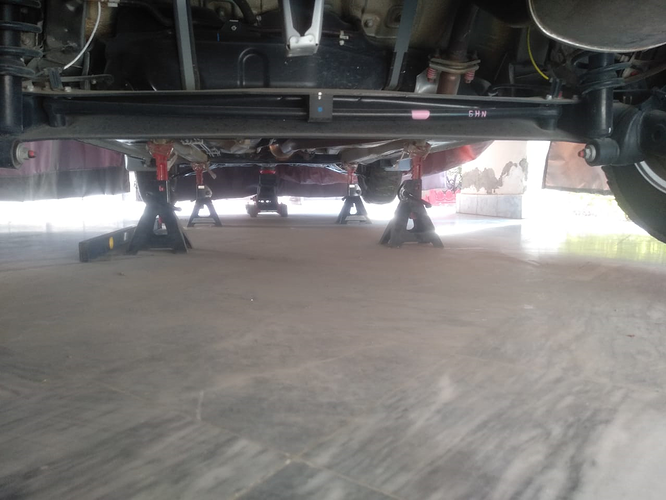
2.Lift your car to appropriate height and place the stands underneath.
The 3.5 ton jack is used at front to correct the level of car in longitudinal direction to within +/- 1 degree.
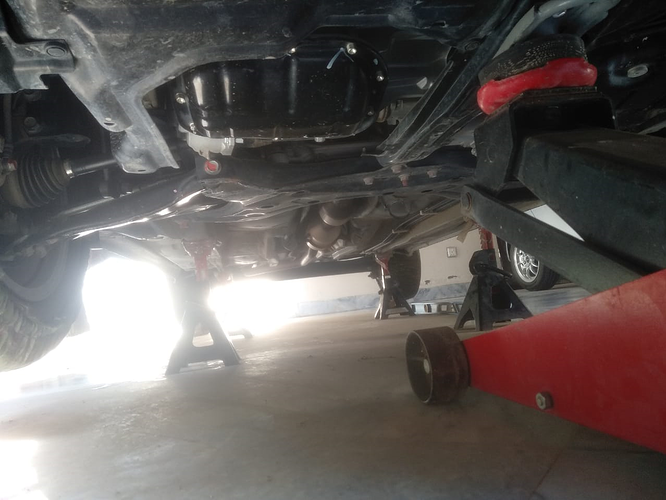
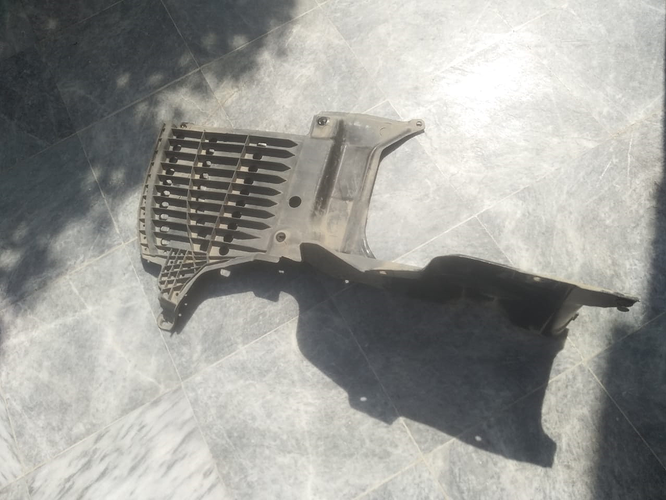
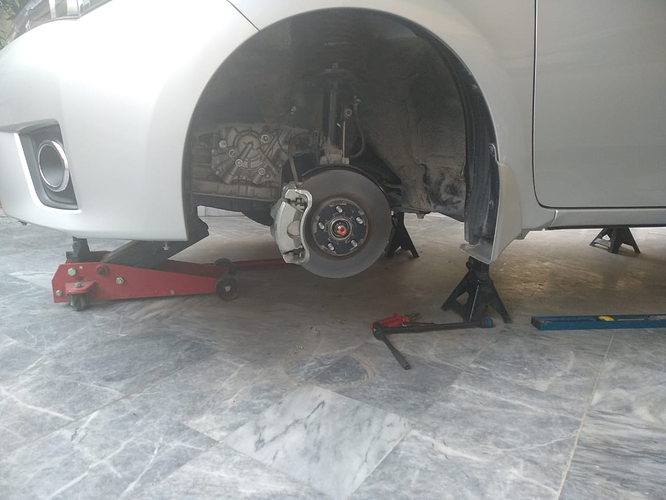
3.Remove the left tire and then remove the left-side shield and bottom shield. Be careful in removing it, the clips can be taken out without breaking them.
From the left side you will be able to view the CVT. A big 24 mm nut can be seen with marking "FE", this is the fill port. You will need extension to 24 mm socket.
The 6 mm L-key will be needed to loosen the drain plug.
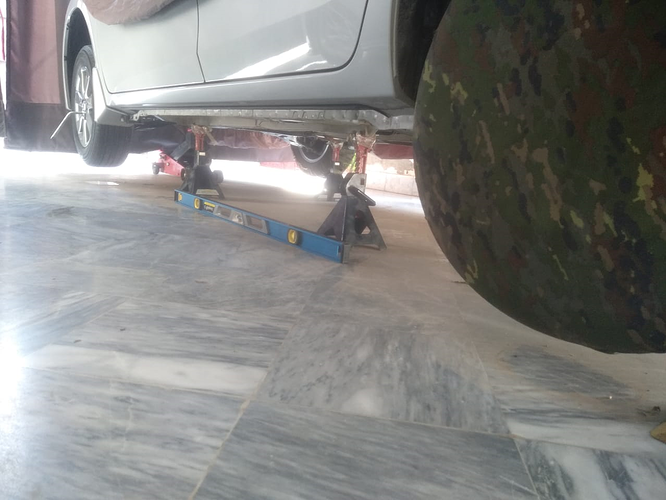
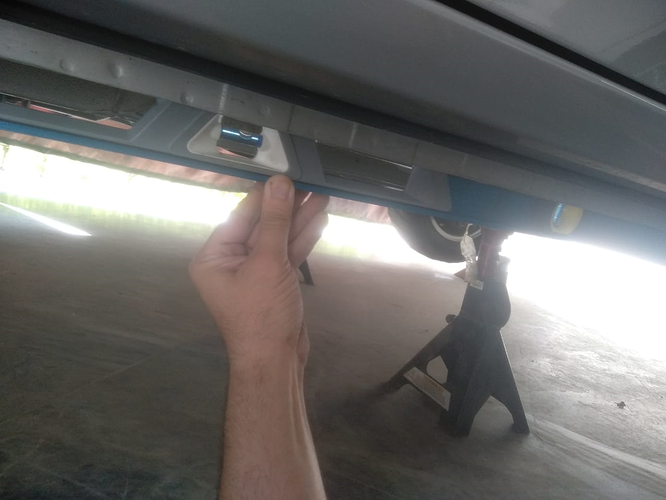
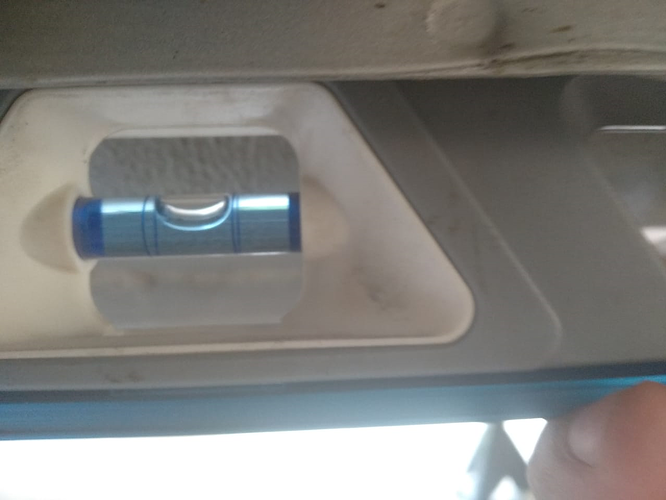
4.Now level the car. The level must be placed below the floor on flat surface. Any level difference must be adjusted by lowering or raising the hydraulic jack placed at the front side of car. The car might not be resting on stands; but they should be kept below the car for safety.
Most preferable flat portion to check level
Correct level by raising or lowering the hydraulic jack at front of car
A global view of car which is ready for CVT fluid change.
5.Arrange the glass flasks and tray close to the car, as we will drain the CVT fluid in next step.
Graduated glass flasks for exact measurement of CVT fluid drained
Trays for collecting fluid to avoid spill
NOTE: House keeping is the key in successful and professional work. I have found most of the dealerships not fully complying to proper house keeping.
6.Removal of CVT fluid drain nut using 6 mm L-key. Collect the fluid in flask or tray as appropriate.
Opening of CVT drain nut using 6 mm L-key. The fluid is then measured.
New fluid being measured in graduated flask
Note: We have not used gloves in collecting and dealing with CVT Fluid which is a mistake; it must be avoided and rubber gloves should be used.
Old CVT fluid is collected in plastic container at right side. New CVTF-FE fluid tin is seen at left side in 4 lit tin.
NOTE: In my car 1.6 liter of CVT fluid came out after opening of drain nut (the engine was off).
7.Use the same L-key to remove the *1 (Filler Tube) which is within the drain nut. After removing the Filler Tube another 1.0 liter was collected. Thus total of 2.6 liter was collected at the end of this step. After collection of all this fluid; install back the *1 Filler Tube using L key and also install back the Drain Nut. Tighten the drain nut to a reasonable amount so that we can open it few times more in next steps.
8.Measure the exact fresh quantity (in my case 2.6 liter was measured) of CVTF-FE and pour it back via 24 mm nut (picture shown above, it is accessed from left tire well). You can see the video below showing adding of CVT fluid through 24 mm filling port.
Please note that we will repeat three such cycles of Drain-and-Fill. After adding in fresh measured fluid, we will start the car, cycle the gears and turn off the engine for reopening the drain nut and repeating this process (I will explain in detail the starting of car and gear cycling).
9.Once you have filled back fresh CVT fluid of same quantity that was drained out; its time to mix the fresh oil (now sitting in pan) with old fluid of your cars transmission sitting in torque converter, cooler etc. Steps are as under:
> Start the engine > Slowly move the shift lever from P to D and then back to P > Allow engine idling for 30 seconds> Turn off the engine
The shift lever should be kept in each position for approx. 3 seconds
10.Repeat the process from Step 6 to Step 9. This will be second time you will drain and fill.
When I did this step, in my case I collected 1.0 liter (Step 6, opening of drain nut) + 1.035 liter (Step 7, removal of filler tube) - means total 2.035 liter was collected.
11.Drain again for last time (third time) by removing Drain Nut and Filler Tube. Now proceed as follows:
> Install the *1 Filler Tube using 6 mm L-key and torque it to 15 in-lb (we wont open it again) > Do not install the Drain Nut, now start adding fresh CVT fluid from 24 mm filler port until dripping of CVT from drain nut starts (engine is OFF) > Close the Drain Nut (to be opened again later) > Measure 1.2 liter of CVT fluid (this called "Specified Amount") > ADJUST FLUID TEMPERATURE > ADJUST FLUID LEVEL
The two critical steps "ADJUST FLUID TEMPERATURE" and "ADJUST FLUID LEVEL" are separately explained below for brevity, as they are lengthy and slightly complicated.
NOTE: These two steps are the most critical and yet very interesting ones.
12.ADJUST FLUID TEMPERATURE is done by following procedure:
Pre-requisite to explore and understand:
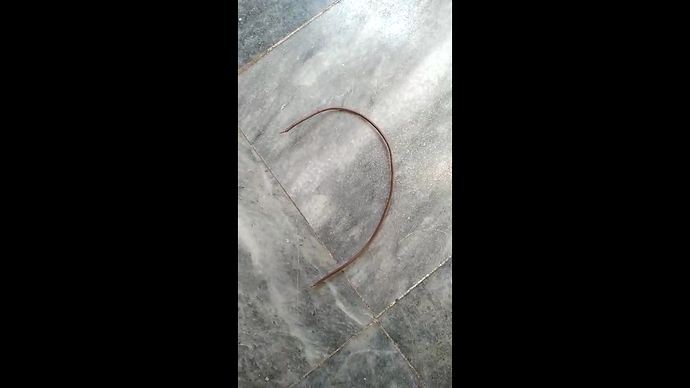
a. You will need about 3 inch to 5 inch long ordinary electric wire with both ends exposed.
b. You will need to locate the DLC3 port in your Altis which is near the bonnet opening handle.
c. In DLC3 port, locate (and I suggest mark to avoid error) PIN # 4 (CG) and PIN # 13 (TC), as indicated in the figure below.
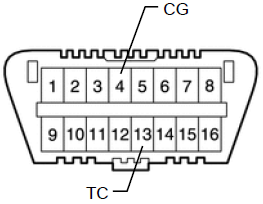
d.The cable is used to short circuit the PIN # 4 and PIN # 13. Please see video below to understand this fundamental step (more details will be explained subsequently).
Apologies for poor video!
e.Activating the CVT Fluid Temperature Detection Mode
The most important and vital part of whole CVT fluid change process is the step of activating the CVT temperature detection mode. A detailed video is provided below, however before you watch this video please keep in mind following steps which will help you quickly understand the process:
Note: I am assuming that you have already cycled the gears from P to D and back twice after starting the engine and then shutting the engine OFF before proceeding to following steps
- Connect the DLC3 Pin # 4 and Pin # 13 as explained above
- Start the engine
- Bring the gear shift lever to N
- Keep an eye on gear shift indicator in your car's LCD display
- Move the shift lever in quick successions between N & D
- The speed of moving the shift lever between N and D should be such that the time interval be less than 1.5 seconds
- You must be repeating the shifting at least for 6 seconds
- If you did the procedure correct, you will observe that D will be steadily displayed in LCD for 2 seconds, despite the fact your shift lever might be at N (during the quick succession movement)
- You may now stop the quick succession movement of shift lever
- Remove the DLC3 cable that you used to connect the two pins
- Bring the shift lever to P
- Do not turn off the engine
- You are now in TEMPERATURE DETECTION MODE of your car
- Please note: IF temperature of CVT fluid inside the transmission is less than 35C; THEN there will be no display at shift indicator LCD (although your shift lever now is in P); IF the temperature is within 35C to 45C THEN you will see D indicated steadily in shift indicator LCD; however if the temperature exceeds the 45C limit, the D indicator in LCD display will start blinking telling you that the CVT temperature has exceeded 45C.
You must be quick for the next step which is ADJUST FLUID LEVEL
Whenever you'll turnoff the engine, the car ECU will exit from TEMPERATURE DETECTION mode. So no special procedure needed to deactivate this mode.
I will post video describing the whole sequence. I will also elaborate the final step of fluid adjustment process
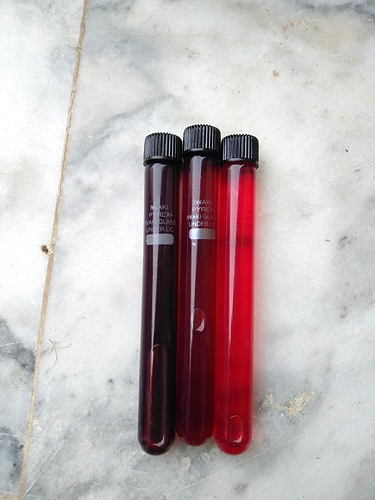
Three samples: Right = brand new fresh CVTF-FE; middle = final CVT fluid inside the transmission after complete process; Left = old CVT fluid, 28,000 km driven & 2 years old
In the last step just before the temperature detection mode is enabled do the following:
a. Install the plastic filler tube into drain nut.
b. Pour CVTF-FE fluid so that it starts dripping.
c. The close the drain nut and pour 1.2 liters of CVTF-FE from the fill port. With this step you will have some extra fluid in the transmission.
d. Now enable the temperature detection mode and wait for desired temperature to reach (35C - 45C) with stable D.
e. With engine running; gear shift level in P, temperature detection mode enabled and as soon as D is lit stable; open the drain nut which will allow the extra fluid to drain out. Once it starts dripping; close the nut and the correct level of CVT fluid is achieved.
f. Make sure to tighten all the nuts as per required torque.
____________________________________________
____________________________________________
SECOND CVTF-FE FLUID CHANGE AFTER 2 YEARS OF USAGE COMING UP SOON
Summary of car is:
Grande is September 2016 model
Current ODO = 49,950 on 20-Nov-2020
Last time CVT fluid changed in September 2018 after 2 years of usage at about 28,000 km
Current plan:
After 2 years and about 22,000 km of usage - I am planning to change the CVT fluid again. This time I plan to open the pan to inspect the sludge (if any at the pan and clean the magnets).
During this process I will also observe the CVT transmission filter/strainer - if found dirty; the filter will also be changed.
Alhumdulliah, completed the CVT fluid change on 05-Dec-2020; please stay tuned for updates