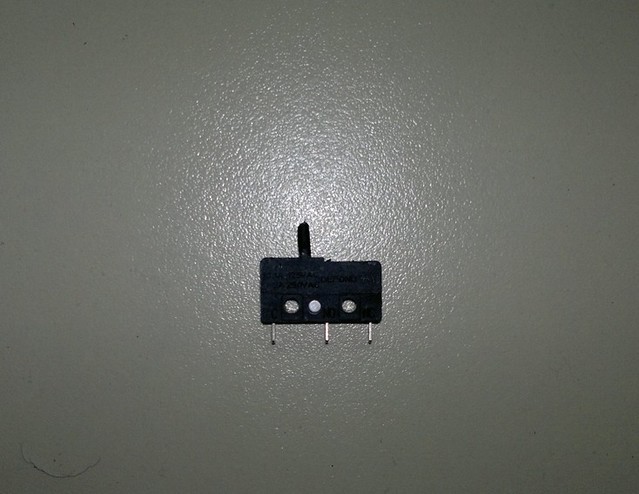
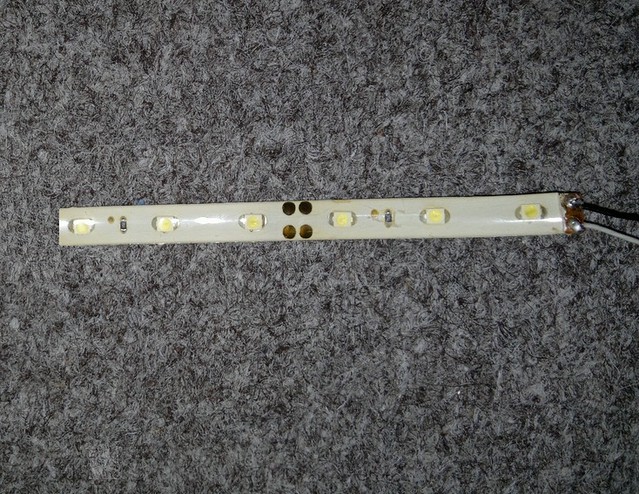
Few of Pakwheelers were asking from @sufwansarwar how to install the glove-box lights that he had prepared. So decided to do it myself on my XLi 2010 model and describe to others how I did it. Hope it helps some to understand. I have to clarify here that I did it with the tools available as I thought fit for the job, however, few may disagree to the tools used being more experienced so all the comments are welcome. Also I have to add that dealing with @sufwansarwar was a great experience as he guides you very thoroughly, thanks bro. Got them for Rs 500/- and @sufwansarwar also gave me two type of switches with it and I used the red one: As it was raining today so had to do it in the garage and had to use a light source also. Tools used were:-
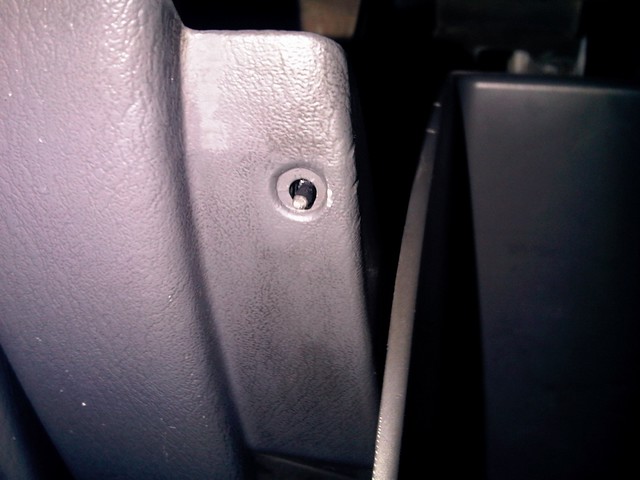
To start with remove the glove-box from dashboard. As shown in the Pic below:press both sides of the glove-box walls toward each other (that is towards the center as depicted by arrows). This will unhook it from the dashboard. Now let fall the glove-box toward the floor of the car and once it stops look on the left side towards the door there is a black colour plastic thingy (it is basically a shock absorber sort of a thing that controls the movement of glove-box while it is opening). Press and move it towards outside (as shown in the picture below) and it will pop off and the glove-box will completely fall down: Now hold the glove-box from both the sides and pull it towards the seat (where you are sitting at the moment), it will completely pull out off the pair of 2 lower hooks: The hook shown with red arrow is not visible but it is there behind the glove-box and is just as marked by the black arrow. Now comes the tricky part for the conscious one's (those who don't want any drill/ hole in the original dash) as it requires one. I selected right side of the glove-box compartment for placing the on/off switch as it is comparatively less observed and dark once you open the glove-box so as the switch is not easily seen. Place the switch where you want to install and draw two marks for reference so as not to make bigger hole then the one needed for placing the switch in: With the hole-rimer drill make a hole and make it wide enough to work with the triangular file tool: Now using the triangular file tool make a square hole so as to place the switch in it: Once the hole is complete (not a must but if you want use sand paper to smoothen the rough edges) place the switch by pressing it in the hole from the cabin side and attach one of the two wires of the switch to power source: In my case I selected the pink wire in the switch cluster behind the glove-box (Picture below) as already fog lights were powered from this earlier. Connect second wire of the switch to the LED panel wire. Now attach the ground wire of LED panel to ground (red arrow):The yellow star marked box is the cabin filter cover for AC.Placed the LED panel on the dashboard at the top as shown in pictures below. It is stickied with double tape supplied with the panel:Now check the on/off button for correct working (Light is Off when the button is pressed and Light is On when switch is not pressed). Using zip ties fasten the loose wires and repeat all the steps backwards to place the glove-box in its bay. And that's the end folks, I think the pictures of the finished project will say it all at the end:
A very good DIY indeed but does this light looks too bright or is it just me ?
amazingly clean! v nice!
Nice diy (Y)
Sent from my HTC One V using Tapatalk 2
Thanks, as far as brightness is concerned I think it is because I took the picture in compete darkness. Here is another one in light, seems alright to me:
Which color leds are these?
Sent from my MT11i using Tapatalk 2
These are warm colour LEDs as I do not like white ones (H).
Thanks
great DIY bro...
Thanks bro, today I did some other stuff the pics will describe :
awesomely done diy (Y)
A good addition to the interior but in my opinion seller is charging way too high for this product.I have done it myself in my car n it costed me not more than Rs. 50/-
RayhanCh, on Flickr
Good Job
I have already done that, post some night pics and remove the patking bulbs
Looking nice though:-)
Thanks and will remove the parking lights and see the result during night. If I replace the parking bulbs with white LED bulbs then how will it look, any idea??
no need just remove the parking bulbs or disconnect them....
+1
Have a look
Its never about just the price. I know u did in 50 Rs thats great. It can also be done with 1 rupee LED 1 rupee resistor and 5 rupee button. The LEDs i am using is imported and i import myself. This LED is not available in twin cities i gurantee. I have surveyed all about them for so long and also remain updated with all things that come in market. I respect opinion and comments of everybody and i do same for ur comment. I also respect those too who says we can give 1500 for these as they are satisfied with the quality of the products. But, my objective is not only to earn money and will never be as its my hobby and i do this in my free time. Sole objective is to promote local made products specially custom made.
Allah bless us all
Here are some night shots after removing the parking bulbs and it does look great: