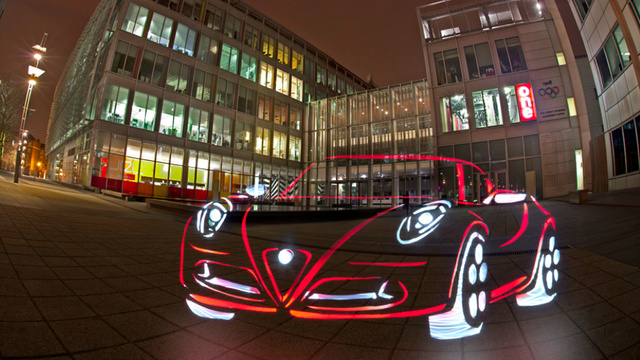
When we first saw the light graffiti cars, we thought of them as born-in-photoshop, but they were not. They were art born in English countryside moving steadily to downtown London. And since we at Pakwheels Blog take things very seriously when it comes to all things auto related, and from time to time we enable you to do incredible things you wouldn’t think were possible. Intrigued? Well of course you are. Stop calling a shrink, just read on to know how Marc Cameron and Mark Brown did it.
Here are the magical and mysterious ingredients required for making your own car appear as graffiti in air:
1. A Camera offering full control over aperture, shutter speed and ISO settings. DSLRs are preferred.
2. A sturdy tripod.
3. A remote shutter release, wired or wireless, however these are optional but recommended for achieving long exposure times.
4. Portable light sources like LEDs, flashlights, even bright-screened cell phones will do. Fluorescent unicorn horns work best.
5. A dark place, very dark place, a place where children don’t go, a very spooky place where. Ok you get the point, the background should be dark.
This magical process of creating your own car has been given the moniker of light painting; it is wizardly really requiring one to be wary of the order of the steps to be taken in conjuring up a car. One wrong move and you could end up in an endless inter galactic free fall. Fear not for we have perfected the craft of car making and shall guide and help you become successful.
You will use the light source to essentially draw a car in the air and the camera will do it’s magic and record that drawing into a picture which you can print life-size and decorate your room with, maybe even glue it on your Prius, since we all know it is one ugly car and you are embarrassed to drive it but light graffiti can make it look cool.
The first step after mounting your camera on a tripod is to connect the remote shutter release to your camera (refer to your camera’s manual). You want the camera to be in bulb mode, meaning you can have a very long exposure allowing you to easily draw a car in the air. When used in conjunction with a remote camera release, wired or wireless, your camera have to be able to do even hours worth of exposure time. A shutter speed of 3-5 minutes should be enough depending upon how elaborate and magical your design of the car is. A small aperture of say between f8-f11 should suffice but you can always use smaller apertures. The reason for a smaller aperture is that it is easier to focus, gives you some leeway in making focusing errors but most importantly it keeps the light trails tack sharp.
After setting the camera to bulb mode and choosing an appropriate aperture, set the focusing mode to manual and focus in approximately where you are going to draw. A delay timer helps to give you time to quickly run to your drawing position if you are doing it solo. Take a few test shots while also painting the light making sure the your light painting is bright enough and distinguishable from the ambient light. After you are satisfied with the settings it is time to let your creative side loose and create whatever car you want.
Some tips to improving your creation would be to try and always point the light source towards the lens of the camera and also make smooth and steady movements. If you want to create a gap, simply turn off the light source or cover it with your hand to block the light. Remember that it will take multiple tries to make it just perfect and if you are trying to write something you will have to write it backwards. The exposure time can be several minutes long, all that data needs some time to process so please be patient while the camera write the data to your memory card before displaying the picture. Turning off the camera while processing could possibly corrupt the memory card.
So that is it, I shall now flee the scene and hide in a remote location while the authorities desperately try to track me down for declassifying this mystic information that was meant to be revealed in 2012.
You can now make your own poster easily.


Pictures via Jalopnik!